Resource limits & requests
Kubernetes allows you to set resource limits and requests for containers in a pod. This is useful for ensuring that containers have enough resources to run, and also for preventing containers from using too many resources.
What are some of the best practices for setting resource limits and requests?
Evicting end-user Pods
If the kubelet is unable to reclaim sufficient resource on the node, kubelet begins evicting Pods.
The kubelet ranks Pods for eviction first by whether their usage of the starved resource exceeds requests, then by Priority, and then by the consumption of the starved compute resource relative to the Pods’ scheduling requests.
Memory limits & requests
Memory management is a complex topic. This section will try to explain the basics of memory management in Kubernetes.
Memory limits
Kubernetes allows you to set memory limits and requests for containers in a pod. This is useful for ensuring that containers have enough memory to run, and also for preventing containers from using too much memory. The rules are simple. If a container exceeds its memory limit, it will be terminated. If you set a memory limit of 1Gi and the container uses 2Gi, the container will be terminated. If you set a memory limit of 1Gi and the container uses 1Gi, the container will not be terminated.
Memory requests
During scheduling, the kubelet will ensure that a Pod is only placed onto a Node which has enough free memory to satisfy the Pod’s memory request. Requesting memory is a garentee that the container will get at least that much memory at runtime. This memory can only be allocated once and is reserved for exclusive use by that container even if the container is not using it. For example if you request your app to have 6Gi memory it will be reserved for your app even if its actual usage would be for example 200Mi. If the node has 10Gi memory that will mean that node is now 60% full even if actual memory usage is 200Mi. This is why it is important to set correct memory requests.
However, you can also do the wrong thing and set the memory to low. If you set the memory request to 200Mi (without limits) and the actual usage is 6Gi the container will be at risk of termination by the evictor. ( see Evicting end-user Pods )
What if you have no memory request or limit?
If you don't set any memory request or limit the container will be able to use all the memory on the node. This is not a good idea as it can cause the node to run out of memory and crash. It is recommended to set memory requests and limits for all containers.
The bigger picture of memory allocation
In this section we will go over the bigger picture of memory allocation in Kubernetes. The examples are simplified to make it easier to understand. We will look at this like a 'story' of what happens when you set memory requests for your applications.
Chapter 1: Setting up too big requested memory
The following example has good intentions, 3 applications with no replicas they have enough requested memory to grow and not get terminated.
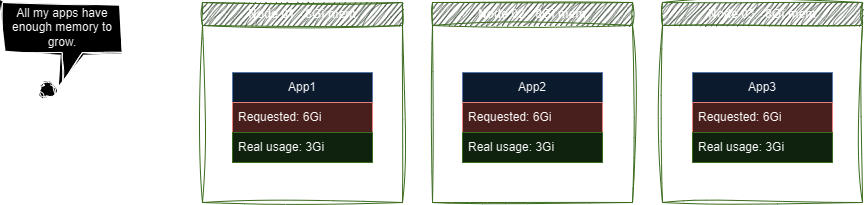
The above example has a problem, there is no room for any of the applications to be migrated to another node in case of downtime.
Chapter 2: What happens when a node goes down?
If node 3 were to go down, there is no free space for App3 to be migrated to another node as there is no room for it. This causes downtime for App3.
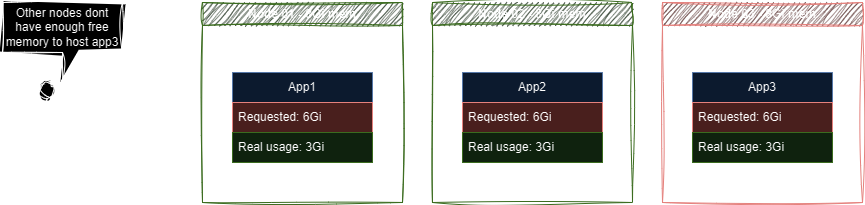
If we carefully consider real usage vs requested and limited we can make a better prediction what happens when a node goes down, and if this impacts our applications.
Info
You should always aim to allow for at least 1 node to go down without impacting your applications.
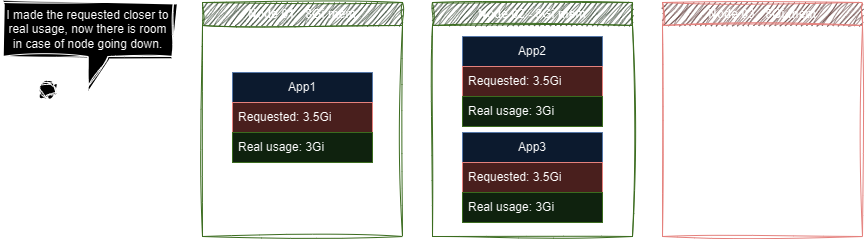
Chapter 3: Setting up high available applications
During the re-schedule of App3 when node 3 went down, there was still downtime. This is because there was only 1 replica of App3 and it was scheduled on node 3. If we had 2 replicas of App3 and they were scheduled on different nodes, there would be no downtime. Let fix it. We have marked apps with r1 and r2 to indicate replicas.
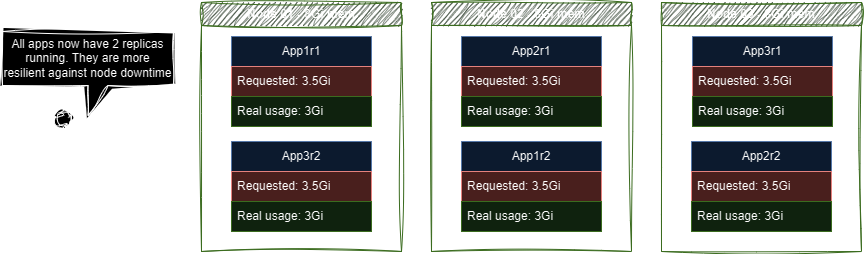
The cluster doesn't have enough memory to reschedule any of the apps in case of downtime, the applications would continue to function because there is still one replica active, but possibly in a slower/degraded state.
Chapter 4: Dont pack your cluster free memory to tight
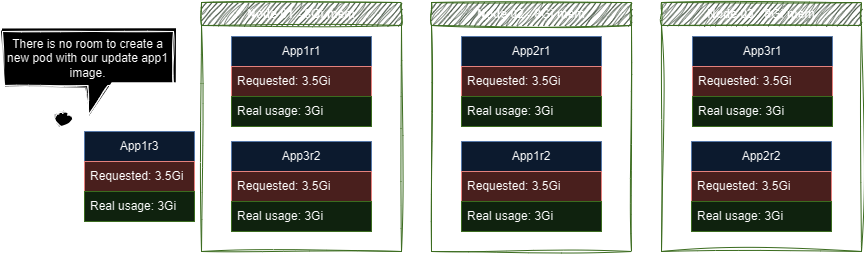
There is however a bigger problem with the current setup, the memory requested in the cluster is very high that means that if we were to change the image on any of our applications the upgrade strategy would try to first create one new pod and then delete the old one. However looking at our current memory usage we can see that there is no room for the new pod to be created. This means that the upgrade will fail. This is not good.
Chapter 5: Adding a new node
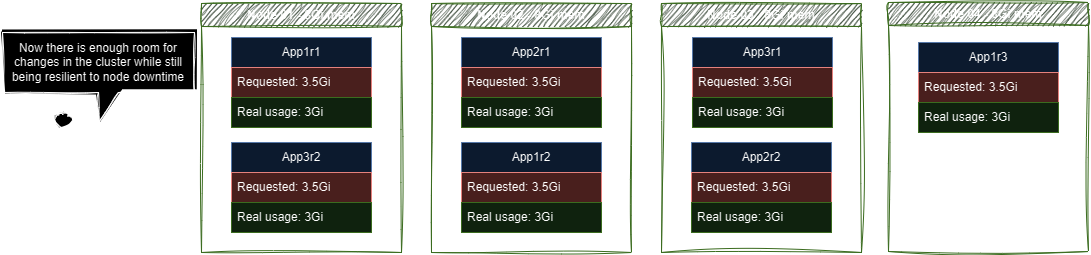
Its time to add an extra node to our cluster, this will allow us to have more memory available for upgrades and rescheduling.
Final thoughts on memory management
- Always set memory requests and limits for all containers.
- Always aim to allow for at least 1 node to go down without impacting your applications.
- Always aim to have enough memory available for upgrades and rescheduling.
- Keep in mind that the memory usage of your applications can change over time.
- Keep in mind that True installs applications on your cluster and kubernetes itself also use memory on the nodes.
If you get stuck, need help with memory management or want some advice on how to set memory requests and limits for your applications, please contact the True Kubernetes team.
CPU limits & requests
CPU management is a very complex topic, it has many layers and it is very hard to explain in a few sentences. This section will try to explain the basics of CPU management in Kubernetes.
CPU limit and CPU request have a different meaning than memory limit and memory request.
CPU request
During scheduling, the kubelet will ensure that a Pod is only placed onto a Node which has enough free CPU time to satisfy the Pod’s CPU request. Requesting CPU time is a garentee that the container will get at least that much CPU time at runtime. The CPU time can still be used by other pods on the node if your application is not using it.
CPU request actually is a guaranteed amount of CPU time that will be available for your application. This means that if you set a CPU request of 100m (100 milli cores) your application will always have 100m CPU time available. Unlike memory request, CPU request is not reserved for your application. This means that if your application is not using the CPU time, other applications can use it. This is why it is important to set correct CPU requests.
Lets do a simple example.
If you have 2 applications with the following CPU requests:
- App1: 100m
- App2: 200m
If App1 is using 100m CPU time and App2 is using 100m CPU time, App2 will get priority to get CPU time over App1. This is because App2 has a higher CPU request. For every 1m CPU time that App2 is using, App1 will get 0.5m CPU time. This is because App1 has half the CPU request of App2. This effect is only visible when there is CPU contention.
CPU limit
CPU limit is the maximum amount of CPU time that your application can use. If you set a CPU limit of 100m (100 milli cores) your application will never be able to use more than 100m CPU time. If your application tries to use more than 100m CPU time, it will be throttled. This is why you should NOT set CPU limits for your applications.
Why no CPU limits?
The total CPU time availability is a fixed number. If the CPU is not used its wasted.
Lets do a simple example.
Total system CPU time: 1000m
App1: 200m CPU request with no CPU limit
App2: 200m CPU request with 200m CPU limit
Scenario 1:
- App1 becomes very busy
- App2 does not use any CPU time
Result:
When App1 becomes busy it could use 200m CPU time + 800m CPU time. It can use the full 1000m CPU time. This is because App2 is not using any CPU time. This is good.
Scenario 2:
- App1 does not use any CPU time
- App2 becomes very busy
Result:
When App2 becomes busy it will use 200m CPU time. This is because it has a CPU limit of 200m, the CPU will become throttled. This is bad. It could have used 800m CPU time.
Scenario 3:
- App1 becomes very busy
- App2 becomes very busy
Result:
App2 will use 200m CPU time and will start getting throttled. App1 will use 200m + 600m CPU time.
For every 1m CPU time that App2 is using, App1 will get 3m CPU time. This is because CPU limit on App2. This effect is only visible when there is CPU contention.
Looking at scenario 3 you'd think that you can prioritize App1 over App2 using CPU limit. However, this comes at the cost that when App1 is not using any CPU time, the CPU time is wasted. This is why you should NOT set CPU limits for your applications.
If you want to prioritize App1 over App2, you should set a higher CPU request for App1. This will give App1 priority to get CPU time over App2. This is because App1 has a higher CPU request while maintaining the ability for App2 to use all the CPU time when App1 is not using any CPU time.
What if you have no CPU request or limit?
No CPU request or limit means your application has the LOWEST priority to get ANY cpu time. This means that your application will only get CPU time when there is no other application that needs CPU time. This is not a good idea as it can cause your application to be very slow.
If all pods have no CPU limit then there is no more control over what application is important in your cluster, a cronjob could take ALL cpu time, while your frontend is not able to get any cpu time, causing your visitors to have a slow experience.